消費者驅動契約 (CDC) 逐步指南:以生產者端的契約
考慮一個詐欺偵測和貸款發放流程的範例。業務情境是我們想要向人們發放貸款,但不希望他們從我們這裡偷竊。我們系統目前的實作是向所有人發放貸款。
假設 貸款發放 是 詐欺偵測 伺服器的用戶端。在目前的 sprint 中,我們必須開發一個新功能:如果客戶想要借太多錢,我們會將該客戶標記為詐欺。
技術說明
-
詐欺偵測的
artifact-id為http-server。 -
貸款發放的
artifact-id為http-client。 -
兩者的
group-id均為com.example。 -
為了這個範例,
Stub 儲存是 Nexus/Artifactory。
社群說明
-
用戶端和伺服器開發團隊都需要直接溝通,並在進行過程中討論變更。
-
CDC 完全是關於溝通。
伺服器端程式碼可在 Spring Cloud Contract 的儲存庫 samples/standalone/dsl/http-server 路徑下取得,而用戶端程式碼可在 Spring Cloud Contract 的儲存庫 samples/standalone/dsl/http-client 路徑下取得。
| 在這種情況下,生產者擁有契約。實際上,所有契約都在生產者的儲存庫中。 |
技術注意事項
如果您使用 SNAPSHOT、Milestone 或 Release Candidate 版本,您需要將以下章節新增至您的建置中
-
Maven
<repositories>
	<repository>
		<id>spring-snapshots</id>
		<name>Spring Snapshots</name>
		<url>https://repo.spring.io/snapshot</url>
		<snapshots>
			<enabled>true</enabled>
		</snapshots>
	</repository>
	<repository>
		<id>spring-milestones</id>
		<name>Spring Milestones</name>
		<url>https://repo.spring.io/milestone</url>
		<snapshots>
			<enabled>false</enabled>
		</snapshots>
	</repository>
</repositories>
<pluginRepositories>
	<pluginRepository>
		<id>spring-snapshots</id>
		<name>Spring Snapshots</name>
		<url>https://repo.spring.io/snapshot</url>
		<snapshots>
			<enabled>true</enabled>
		</snapshots>
	</pluginRepository>
	<pluginRepository>
		<id>spring-milestones</id>
		<name>Spring Milestones</name>
		<url>https://repo.spring.io/milestone</url>
		<snapshots>
			<enabled>false</enabled>
		</snapshots>
	</pluginRepository>
</pluginRepositories>repositories {
mavenCentral()
mavenLocal()
maven { url "https://repo.spring.io/snapshot" }
maven { url "https://repo.spring.io/milestone" }
}為了簡化,我們使用以下縮寫
-
貸款發放 (LI):HTTP 用戶端
-
詐欺偵測 (FD):HTTP 伺服器
-
SCC:Spring Cloud Contract
消費者端(貸款發放)
作為貸款發放服務(詐欺偵測伺服器的消費者)的開發人員,您可能會執行以下步驟
-
透過為您的功能編寫測試來開始進行 TDD。
-
編寫遺失的實作。
-
在本機複製詐欺偵測服務儲存庫。
-
在本機詐欺偵測服務的儲存庫中定義契約。
-
新增 Spring Cloud Contract (SCC) 外掛程式。
-
執行整合測試。
-
提交 Pull Request。
-
建立初始實作。
-
接手 Pull Request。
-
編寫遺失的實作。
-
部署您的應用程式。
-
在線上工作。
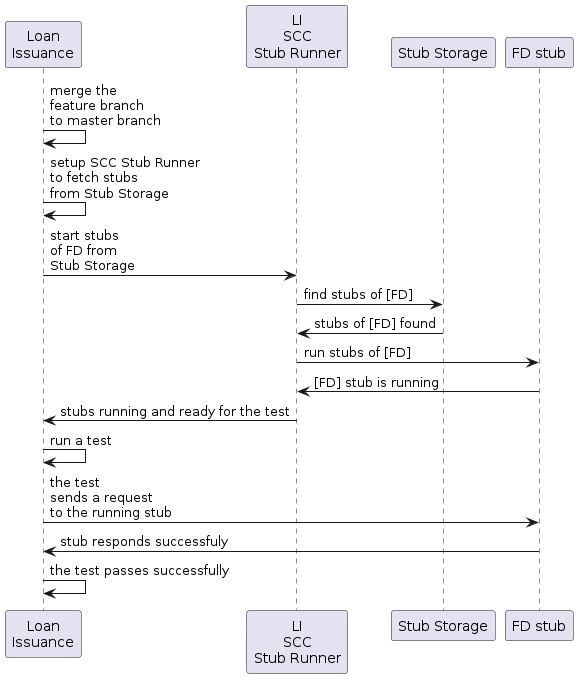
我們先從貸款發放流程開始,以下 UML 圖表顯示了該流程
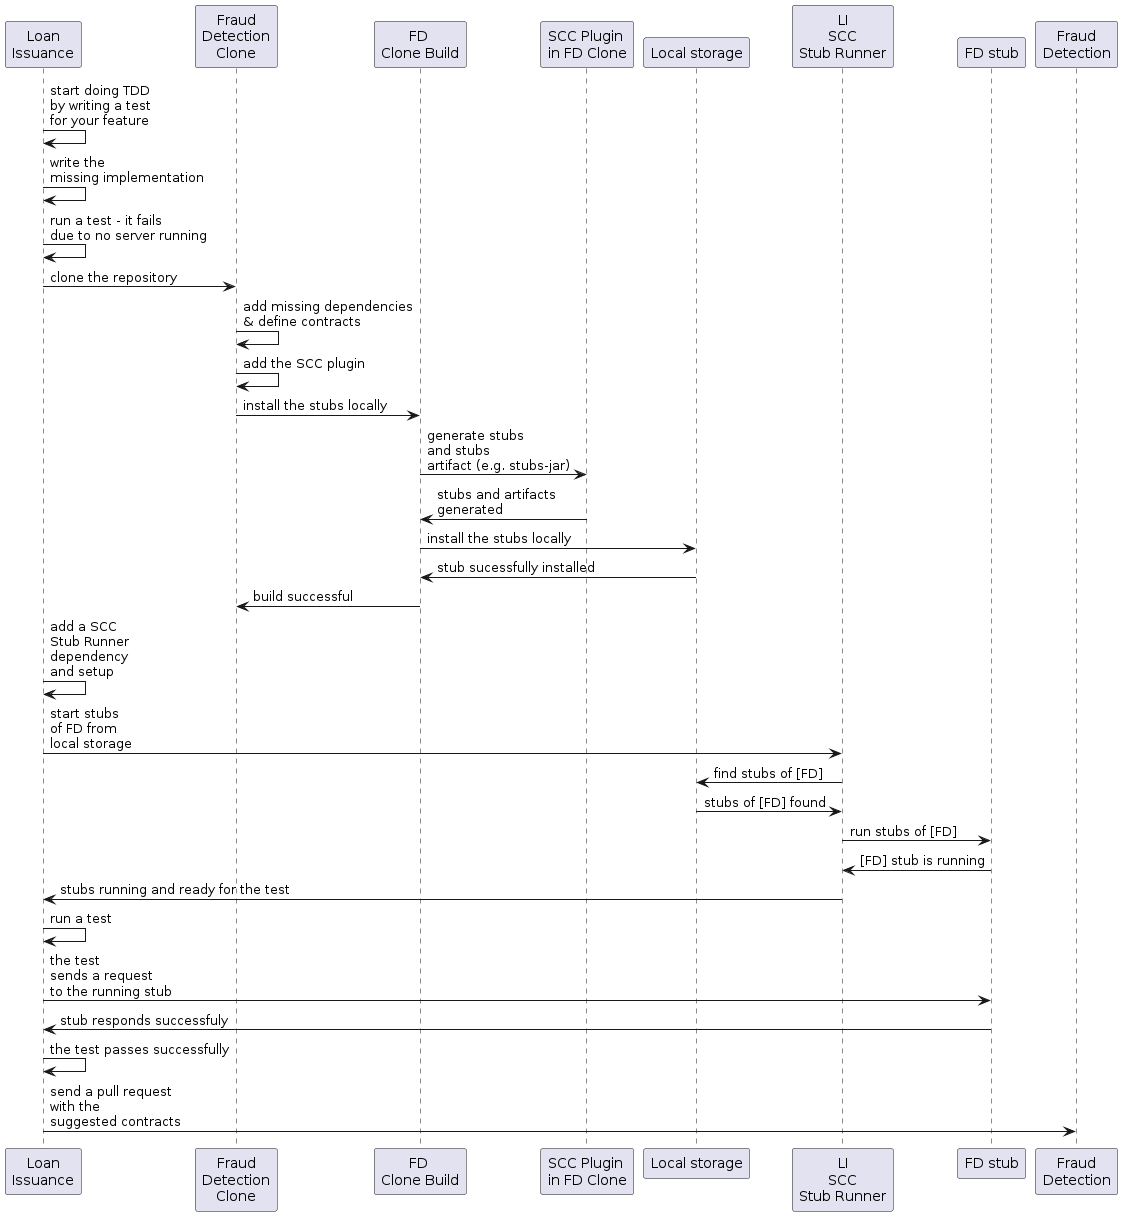
透過為您的功能編寫測試來開始進行 TDD
以下列表顯示了我們可能用來檢查貸款金額是否過大的測試
@Test
public void shouldBeRejectedDueToAbnormalLoanAmount() {
	// given:
	LoanApplication application = new LoanApplication(new Client("1234567890"),
			99999);
	// when:
	LoanApplicationResult loanApplication = service.loanApplication(application);
	// then:
	assertThat(loanApplication.getLoanApplicationStatus())
			.isEqualTo(LoanApplicationStatus.LOAN_APPLICATION_REJECTED);
	assertThat(loanApplication.getRejectionReason()).isEqualTo("Amount too high");
}
假設您已編寫了新功能的測試。如果收到大額貸款申請,系統應拒絕該貸款申請,並提供一些描述。
編寫遺失的實作
在某些時候,您需要將請求發送到詐欺偵測服務。假設您需要發送包含客戶 ID 和客戶想要借款金額的請求。您想要使用 PUT 方法將其發送到 /fraudcheck URL。為此,您可能會使用類似於以下的程式碼
ResponseEntity<FraudServiceResponse> response = restTemplate.exchange(
		"https://#:" + port + fraudCheck(), HttpMethod.PUT,
		new HttpEntity<>(request, httpHeaders), FraudServiceResponse.class);
為了簡化,詐欺偵測服務的連接埠設定為 8080,而應用程式在 8090 上執行。
如果您在此時啟動測試,它會中斷,因為目前沒有服務在連接埠 8080 上執行。 |
在本機複製詐欺偵測服務儲存庫
您可以從試用伺服器端契約開始。為此,您必須先複製它,方法是執行以下命令
$ git clone https://your-git-server.com/server-side.git local-http-server-repo在本機詐欺偵測服務的儲存庫中定義契約
作為消費者,您需要定義您想要達成的目標。您需要制定您的期望。為此,請編寫以下契約
將契約放置在 src/test/resources/contracts/fraud 資料夾中。fraud 資料夾很重要,因為生產者的測試基底類別名稱參考了該資料夾。 |
以下範例顯示了我們的契約,Groovy 和 YAML 兩種格式
org.springframework.cloud.contract.spec.Contract.make {
	request { // (1)
		method 'PUT' // (2)
		url '/fraudcheck' // (3)
		body([ // (4)
			   "client.id": $(regex('[0-9]{10}')),
			   loanAmount : 99999
		])
		headers { // (5)
			contentType('application/json')
		}
	}
	response { // (6)
		status OK() // (7)
		body([ // (8)
			   fraudCheckStatus  : "FRAUD",
			   "rejection.reason": "Amount too high"
		])
		headers { // (9)
			contentType('application/json')
		}
	}
}

/*
From the Consumer perspective, when shooting a request in the integration test:

(1) - If the consumer sends a request
(2) - With the "PUT" method
(3) - to the URL "/fraudcheck"
(4) - with the JSON body that
 * has a field `client.id` that matches a regular expression `[0-9]{10}`
 * has a field `loanAmount` that is equal to `99999`
(5) - with header `Content-Type` equal to `application/json`
(6) - then the response will be sent with
(7) - status equal `200`
(8) - and JSON body equal to
 { "fraudCheckStatus": "FRAUD", "rejectionReason": "Amount too high" }
(9) - with header `Content-Type` equal to `application/json`

From the Producer perspective, in the autogenerated producer-side test:

(1) - A request will be sent to the producer
(2) - With the "PUT" method
(3) - to the URL "/fraudcheck"
(4) - with the JSON body that
 * has a field `client.id` that will have a generated value that matches a regular expression `[0-9]{10}`
 * has a field `loanAmount` that is equal to `99999`
(5) - with header `Content-Type` equal to `application/json`
(6) - then the test will assert if the response has been sent with
(7) - status equal `200`
(8) - and JSON body equal to
 { "fraudCheckStatus": "FRAUD", "rejectionReason": "Amount too high" }
(9) - with header `Content-Type` matching `application/json.*`
*/request: # (1)
method: PUT # (2)
url: /yamlfraudcheck # (3)
body: # (4)
"client.id": 1234567890
loanAmount: 99999
headers: # (5)
Content-Type: application/json
matchers:
body:
- path: $.['client.id'] # (6)
type: by_regex
value: "[0-9]{10}"
response: # (7)
status: 200 # (8)
body: # (9)
fraudCheckStatus: "FRAUD"
"rejection.reason": "Amount too high"
headers: # (10)
Content-Type: application/json
#From the Consumer perspective, when shooting a request in the integration test:
#
#(1) - If the consumer sends a request
#(2) - With the "PUT" method
#(3) - to the URL "/yamlfraudcheck"
#(4) - with the JSON body that
# * has a field `client.id`
# * has a field `loanAmount` that is equal to `99999`
#(5) - with header `Content-Type` equal to `application/json`
#(6) - and a `client.id` json entry matches the regular expression `[0-9]{10}`
#(7) - then the response will be sent with
#(8) - status equal `200`
#(9) - and JSON body equal to
# { "fraudCheckStatus": "FRAUD", "rejectionReason": "Amount too high" }
#(10) - with header `Content-Type` equal to `application/json`
#
#From the Producer perspective, in the autogenerated producer-side test:
#
#(1) - A request will be sent to the producer
#(2) - With the "PUT" method
#(3) - to the URL "/yamlfraudcheck"
#(4) - with the JSON body that
# * has a field `client.id` `1234567890`
# * has a field `loanAmount` that is equal to `99999`
#(5) - with header `Content-Type` equal to `application/json`
#(7) - then the test will assert if the response has been sent with
#(8) - status equal `200`
#(9) - and JSON body equal to
# { "fraudCheckStatus": "FRAUD", "rejectionReason": "Amount too high" }
#(10) - with header `Content-Type` equal to `application/json`YML 契約非常簡單明瞭。但是,當您查看使用靜態型別 Groovy DSL 編寫的契約時,您可能會想知道 value(client(…), server(…)) 部分是什麼。透過使用此符號,Spring Cloud Contract 可讓您定義 JSON 區塊、URL 或其他動態結構的部分。對於識別碼或時間戳記的情況,您不需要硬式編碼值。您想要允許一些不同的值範圍。若要啟用值範圍,您可以設定符合消費者端值的正則運算式。您可以透過地圖符號或帶有插補的 String 來提供主體。我們強烈建議使用地圖符號。
| 若要設定契約,您必須了解地圖符號。請參閱關於 JSON 的 Groovy 文件。 |
先前顯示的契約是雙方之間的協議,即
-
如果傳送了符合以下所有條件的 HTTP 請求
-
/fraudcheck端點上的PUT方法 -
JSON 主體,其中
client.id符合正則運算式[0-9]{10},且loanAmount等於99999 -
Content-Type標頭,值為application/vnd.fraud.v1+json
-
-
然後將 HTTP 回應傳送給消費者,其中
-
狀態碼為
200 -
包含 JSON 主體,其中
fraudCheckStatus欄位包含值FRAUD,而rejectionReason欄位的值為Amount too high -
Content-Type標頭,值為application/vnd.fraud.v1+json
-
當您準備好在整合測試中實際檢查 API 時,您需要在本機安裝 Stub。
新增 Spring Cloud Contract Verifier 外掛程式
我們可以新增 Maven 或 Gradle 外掛程式。在此範例中,我們示範如何新增 Maven。首先,我們新增 Spring Cloud Contract BOM,如下列範例所示
<dependency>
	<groupId>org.springframework.cloud</groupId>
	<artifactId>spring-cloud-contract-dependencies</artifactId>
	<version>${spring-cloud-contract.version}</version>
	<type>pom</type>
	<scope>import</scope>
接下來,新增 Spring Cloud Contract Verifier Maven 外掛程式,如下列範例所示
			<plugin>
				<groupId>org.springframework.cloud</groupId>
				<artifactId>spring-cloud-contract-maven-plugin</artifactId>
				<version>${spring-cloud-contract.version}</version>
				<extensions>true</extensions>
				<configuration>
					<packageWithBaseClasses>com.example.fraud</packageWithBaseClasses>
<!--					<convertToYaml>true</convertToYaml>-->
				</configuration>
			</plugin>
由於已新增外掛程式,您將獲得 Spring Cloud Contract Verifier 功能,這些功能來自提供的契約
-
產生並執行測試
-
產生並安裝 Stub
您不想要產生測試,因為作為消費者,您只想使用 Stub。您需要略過測試產生和調用。為此,請執行以下命令
$ cd local-http-server-repo
$ ./mvnw clean install -DskipTests
執行這些命令後,您應該會在日誌中看到類似以下內容
[INFO] --- spring-cloud-contract-maven-plugin:1.0.0.BUILD-SNAPSHOT:generateStubs (default-generateStubs) @ http-server ---
[INFO] Building jar: /some/path/http-server/target/http-server-0.0.1-SNAPSHOT-stubs.jar
[INFO]
[INFO] --- maven-jar-plugin:2.6:jar (default-jar) @ http-server ---
[INFO] Building jar: /some/path/http-server/target/http-server-0.0.1-SNAPSHOT.jar
[INFO]
[INFO] --- spring-boot-maven-plugin:1.5.5.BUILD-SNAPSHOT:repackage (default) @ http-server ---
[INFO]
[INFO] --- maven-install-plugin:2.5.2:install (default-install) @ http-server ---
[INFO] Installing /some/path/http-server/target/http-server-0.0.1-SNAPSHOT.jar to /path/to/your/.m2/repository/com/example/http-server/0.0.1-SNAPSHOT/http-server-0.0.1-SNAPSHOT.jar
[INFO] Installing /some/path/http-server/pom.xml to /path/to/your/.m2/repository/com/example/http-server/0.0.1-SNAPSHOT/http-server-0.0.1-SNAPSHOT.pom
[INFO] Installing /some/path/http-server/target/http-server-0.0.1-SNAPSHOT-stubs.jar to /path/to/your/.m2/repository/com/example/http-server/0.0.1-SNAPSHOT/http-server-0.0.1-SNAPSHOT-stubs.jar
以下這一行非常重要
[INFO] Installing /some/path/http-server/target/http-server-0.0.1-SNAPSHOT-stubs.jar to /path/to/your/.m2/repository/com/example/http-server/0.0.1-SNAPSHOT/http-server-0.0.1-SNAPSHOT-stubs.jar它確認 http-server 的 Stub 已安裝在本機儲存庫中。
執行整合測試
為了從 Spring Cloud Contract Stub Runner 自動 Stub 下載功能中獲益,您必須在消費者端專案(貸款申請服務)中執行以下操作
-
新增
Spring Cloud ContractBOM,如下所示<dependencyManagement> <dependencies> <dependency> <groupId>org.springframework.cloud</groupId> <artifactId>spring-cloud-contract-dependencies</artifactId> <version>${spring-cloud-contract.version}</version> <type>pom</type> <scope>import</scope> </dependency> <dependency> <groupId>org.springframework.cloud</groupId> <artifactId>spring-cloud-stream-dependencies</artifactId> <version>${spring-cloud-stream.version}</version> <type>pom</type> <scope>import</scope> </dependency> </dependencies> </dependencyManagement> -
新增對
Spring Cloud Contract Stub Runner的相依性,如下所示<dependency> <groupId>org.springframework.cloud</groupId> <artifactId>spring-cloud-starter-contract-stub-runner</artifactId> <scope>test</scope> </dependency> -
使用
@AutoConfigureStubRunner註解您的測試類別。在註解中,提供group-id和artifact-id,讓 Stub Runner 下載您的協作者的 Stub。@SpringBootTest(webEnvironment = WebEnvironment.NONE) @AutoConfigureStubRunner(ids = { "com.example:http-server-dsl:0.0.1:stubs"}, stubsMode = StubRunnerProperties.StubsMode.LOCAL) public class LoanApplicationServiceTests { -
(可選)由於您正在離線試用協作者,您也可以提供離線工作切換(
StubRunnerProperties.StubsMode.LOCAL)。
現在,當您執行測試時,您會在日誌中看到類似以下的輸出
2016-07-19 14:22:25.403  INFO 41050 --- [           main] o.s.c.c.stubrunner.AetherStubDownloader  : Desired version is + - will try to resolve the latest version
2016-07-19 14:22:25.438  INFO 41050 --- [           main] o.s.c.c.stubrunner.AetherStubDownloader  : Resolved version is 0.0.1-SNAPSHOT
2016-07-19 14:22:25.439  INFO 41050 --- [           main] o.s.c.c.stubrunner.AetherStubDownloader  : Resolving artifact com.example:http-server:jar:stubs:0.0.1-SNAPSHOT using remote repositories []
2016-07-19 14:22:25.451  INFO 41050 --- [           main] o.s.c.c.stubrunner.AetherStubDownloader  : Resolved artifact com.example:http-server:jar:stubs:0.0.1-SNAPSHOT to /path/to/your/.m2/repository/com/example/http-server/0.0.1-SNAPSHOT/http-server-0.0.1-SNAPSHOT-stubs.jar
2016-07-19 14:22:25.465  INFO 41050 --- [           main] o.s.c.c.stubrunner.AetherStubDownloader  : Unpacking stub from JAR [URI: file:/path/to/your/.m2/repository/com/example/http-server/0.0.1-SNAPSHOT/http-server-0.0.1-SNAPSHOT-stubs.jar]
2016-07-19 14:22:25.475  INFO 41050 --- [           main] o.s.c.c.stubrunner.AetherStubDownloader  : Unpacked file to [/var/folders/0p/xwq47sq106x1_g3dtv6qfm940000gq/T/contracts100276532569594265]
2016-07-19 14:22:27.737  INFO 41050 --- [           main] o.s.c.c.stubrunner.StubRunnerExecutor    : All stubs are now running RunningStubs [namesAndPorts={com.example:http-server:0.0.1-SNAPSHOT:stubs=8080}]
此輸出表示 Stub Runner 已找到您的 Stub,並為您的應用程式啟動伺服器,其群組 ID 為 com.example,構件 ID 為 http-server,Stub 版本為 0.0.1-SNAPSHOT,分類器為 stubs,連接埠為 8080。
生產者端(詐欺偵測伺服器)
作為詐欺偵測伺服器(貸款發放服務的伺服器)的開發人員,您可能想要
-
接手 Pull Request
-
編寫遺失的實作
-
部署應用程式
以下 UML 圖表顯示了詐欺偵測流程

接手 Pull Request
提醒一下,以下列表顯示了初始實作
@RequestMapping(value = "/fraudcheck", method = PUT)
public FraudCheckResult fraudCheck(@RequestBody FraudCheck fraudCheck) {
return new FraudCheckResult(FraudCheckStatus.OK, NO_REASON);
}
然後您可以執行以下命令
$ git checkout -b contract-change-pr master
$ git pull https://your-git-server.com/server-side-fork.git contract-change-pr
您必須新增自動產生測試所需的相依性,如下所示
<dependency>
	<groupId>org.springframework.cloud</groupId>
	<artifactId>spring-cloud-starter-contract-verifier</artifactId>
	<scope>test</scope>
</dependency>
在 Maven 外掛程式的組態中,您必須傳遞 packageWithBaseClasses 屬性,如下所示
			<plugin>
				<groupId>org.springframework.cloud</groupId>
				<artifactId>spring-cloud-contract-maven-plugin</artifactId>
				<version>${spring-cloud-contract.version}</version>
				<extensions>true</extensions>
				<configuration>
					<packageWithBaseClasses>com.example.fraud</packageWithBaseClasses>
<!--					<convertToYaml>true</convertToYaml>-->
				</configuration>
			</plugin>
此範例透過設定 packageWithBaseClasses 屬性來使用「基於慣例」的命名。這樣做表示最後兩個套件組合起來構成基底測試類別的名稱。在我們的案例中,契約放置在 src/test/resources/contracts/fraud 下。由於您沒有從 contracts 資料夾開始的兩個套件,因此僅選擇一個,即 fraud。新增 Base 後綴並將 fraud 大寫。這會產生 FraudBase 測試類別名稱。 |
所有產生的測試都會擴充該類別。在該處,您可以設定您的 Spring Context 或任何必要的內容。在這種情況下,您應該使用 Rest Assured MVC 來啟動伺服器端 FraudDetectionController。以下列表顯示了 FraudBase 類別
import io.restassured.module.mockmvc.RestAssuredMockMvc;
import org.junit.jupiter.api.BeforeEach;

public class FraudBase {

	@BeforeEach
	public void setup() {
		RestAssuredMockMvc.standaloneSetup(new FraudDetectionController(),
				new FraudStatsController(stubbedStatsProvider()));
	}

	private StatsProvider stubbedStatsProvider() {
		return fraudType -> {
			switch (fraudType) {
			case DRUNKS:
				return 100;
			case ALL:
				return 200;
			}
			return 0;
		};
	}

	public void assertThatRejectionReasonIsNull(Object rejectionReason) {
		assert rejectionReason == null;
	}

}
現在,如果您執行 ./mvnw clean install,您會得到類似以下的輸出
Results :

Tests in error:
  ContractVerifierTest.validate_shouldMarkClientAsFraud:32 » IllegalState Parsed...
發生此錯誤的原因是您有一個新契約,從該契約產生了一個測試,並且由於您尚未實作該功能,因此測試失敗。自動產生的測試看起來會像以下的測試方法
@Test
public void validate_shouldMarkClientAsFraud() throws Exception {
    // given:
        MockMvcRequestSpecification request = given()
                .header("Content-Type", "application/vnd.fraud.v1+json")
                .body("{\"client.id\":\"1234567890\",\"loanAmount\":99999}");

    // when:
        ResponseOptions response = given().spec(request)
                .put("/fraudcheck");

    // then:
        assertThat(response.statusCode()).isEqualTo(200);
        assertThat(response.header("Content-Type")).matches("application/vnd.fraud.v1.json.*");
    // and:
        DocumentContext parsedJson = JsonPath.parse(response.getBody().asString());
        assertThatJson(parsedJson).field("['fraudCheckStatus']").matches("[A-Z]{5}");
        assertThatJson(parsedJson).field("['rejection.reason']").isEqualTo("Amount too high");
}
如果您使用 Groovy DSL,您可以看到 Contract 中存在的所有 producer() 部分都已注入到測試中的 value(consumer(…), producer(…)) 區塊中。如果您使用 YAML,response 的 matchers 區段也會套用相同的規則。
請注意,在生產者端,您也在進行 TDD。期望以測試的形式表示。此測試會將請求傳送到我們自己的應用程式,其中包含契約中定義的 URL、標頭和主體。它也期望回應中具有精確定義的值。換句話說,您擁有 red、green 和 refactor 中的 red 部分。現在是時候將 red 轉換為 green 了。
編寫遺失的實作
因為您知道預期的輸入和預期的輸出,所以您可以編寫遺失的實作,如下所示
@RequestMapping(value = "/fraudcheck", method = PUT)
public FraudCheckResult fraudCheck(@RequestBody FraudCheck fraudCheck) {
if (amountGreaterThanThreshold(fraudCheck)) {
	return new FraudCheckResult(FraudCheckStatus.FRAUD, AMOUNT_TOO_HIGH);
}
return new FraudCheckResult(FraudCheckStatus.OK, NO_REASON);
}
當您再次執行 ./mvnw clean install 時,測試會通過。由於 Spring Cloud Contract Verifier 外掛程式將測試新增至 generated-test-sources,因此您實際上可以從您的 IDE 執行這些測試。